Monday, January 19, 2009

Apple, WIP Day 4


Apple, WIP Day 4
Originally uploaded by jr_goddesstlj

Practicing a new painting technique. The reference photo is here: www.flickr.com/photos/clearlyambiguous/401433179/

Courtesy of Clearly Ambiguous.

Oil on 2'x2' birch panel.

This is the second color layer. I made the green more intense by mixing sap green and hansa yellow.

Sunday, January 11, 2009

Still Life With Granny


Still Life With Granny
Originally uploaded by Clearly Ambiguous

BTW, this is the reference photo. It's beautiful! How could I not want to paint it?

Apple, WIP Day 3


Today I started the first color layer. Whoo! I was really excited about it, but then quickly became depressed when I discovered:

1.)My dead layer wasn't dry. So....yeah.

2.)Either the grey is shining through too much, or the pigments in Dick Blick's paint isn't that strong. I know that pthalo green is pretty transparent, but their paint has no coverage power. Bummer.

3.)A second, and probably third color layer will be necessary.

I've been working on other things as well, but I'm not happy with them anymore. I just get depressed when I look at other people's work. I feel like I'm so far behind. I don't know how I could fix the problem. I don't think that MORE education would be the solution.

Anyway, I also started working on a portrait of my husband. I want to show my teacher that I haven't been totally slacking during the break.

Saturday, January 10, 2009

Apple, WIP Day 2


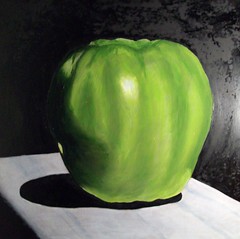
I'm now in the 'dead layer' stage of this painting. I think that it will be dry tomorrow, and then I'm going to apply the first color layer.

Some notes about the painting:

1.)I skipped the second umber layer, and I believe that is why the background looks more brown, instead of black. I applied black to the background, but the umber layer is still shining through. I'll just have to correct that in the color layer.

2.)The top of the apple still needs some work. One of my options is to fix it in the color layer. This will probably be quicker and more practical instead of fixing the (drying) dead layer.

3.)Some of my highlights are popping a little too much. BUT, I read that you are supposed to make your lights lighter than what they really are. I hope they were right.

4.)I'm a little concerned about the uneven drying of the oil. I don't know if that's normal...I hope so.

So, when I wake up tomorrow I'm going to work on my first color layer. This is going to be so much fun! I'm really excited about this painting. It's part of the portfolio that I have to give my painting instructor. That's on Tuesday morning. I'm praying that it will be dry by then.

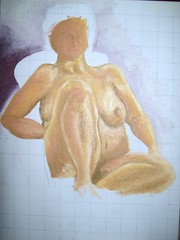
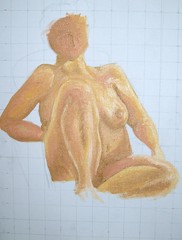
I'm going to try to start on my next painting before I go to sleep, but I don't know if that's going to happen. I was supposed to start that today, but I've been too busy. I was exhausted from the week.

This week is going to be really exhausting. I'm going to school from 9 am until 10 pm. I only have a 2 1/2 hour break during the whole day. Yay.

Thursday, January 8, 2009

Apple, WIP Day One


So....I've started another painting while the other is drying. This time, I'm taking a bit of a different approach to the whole process. I wanted to change my painting style a little, and study what is now called the classic realism style. This style requires a LOT of time and patience, but the rewards are great. So, I went over to WetCanvas, and this site as well, and I found a wealth of information about how to do it.

I went to Lowe's and purchased a 4'x4' panel of 1/8 in. birch wood for about $17. Then I had them quarter the panel into 4 2'x2' panels. They do it for free! When I got the wood home I primed the panels with three coats of gesso, making sure that I sanded with a really smooth grade of sanding paper. The surface of the boards is heavenly. Today I drew my picture on the birch panel using a black Millennium zig pen that has a .05 point. After that I used acrylic paints to lay down the Imprimatura layer. I was happy with the results, and so I continued on to the 1st umber layer. I'm waiting for that to dry now. I'm still not clear on how long it's supposed to take, but I hope it doesn't take a whole week to dry. Maybe I don't have enough patience for this painting style? I would really like to paint like this man, but I don't have the skill yet. I plan on copying this picture anyway...This is my favorite painting.


BTW, I'm sorry about the glare in the photo. The painting is still super wet, and I took the picture at night.

Tuesday, January 6, 2009

WIP, Day 3


WIP, Day 3
Originally uploaded by jr_goddesstlj

This is about how the painting still looks. I've been tweaking it here and there, but progress has slowed a little.

1.)The model's foot is incomplete in my original drawing. So, I'm going to take some refrence photos of my foot to finish that portion.

2.)The face is incomplete in my drawing. I have an idea of what the face should look like but it's going to be a challenge to paint. The size of her face is only about 2x3 inches, and it's hard for me to control the paint at the size. Oh well. Looks like I'll learn something from this painting.

3.)I'm still unhappy with the color of the chair, but I'm not as concerned about it as I was. I purchased Payne's Grey, and that's better than just using Ultramarine for the shadows.

So....I'm going to fil in the bottom of this painting, and then maybe start on another painting. I need some parts of this to dry before I can work on some of the finer details.

WIP, DAY 2


WIP, DAY 2
Originally uploaded by jr_goddesstlj

The next day of progress. It started to make more sense, but I wasn't crazy about the background color.

WIP, Day 1


WIP, Day 1
Originally uploaded by jr_goddesstlj

I started this painting on Jan. 3rd, and have been working on it everyday. This is how it looked after my first day of work.

Thursday, January 1, 2009

Illustration Friday:Clandestine

Came out of nowhere...I made this on bristol paper using markers, and a touch of watercolor paint for her skin tone.
Related Posts with Thumbnails